You encounter a technical issue in the flat you are currently renting, please consult the information in the adapted article in order to find advice and casual check to do. If nothing change and it persists please contact us in order to mandate a professionnal.
We remind you that as tenant of the flat, the casual maintenance of the flat is on your responsability. So if the issue is due to maintenance or anormal issue, the intervention can be on your charge. You can find here under the several interventions on your charge.
SUMMARY
- WATER AND PLUMBING
- ELECTRICITE ET GAZ
- HEATING
- HOUSEHOLD APPLIANCES
- PESTS
- INTERNET
WATER AND PLUMBING
Find the water valve
In recent condominiums, all the main water inlet valves for the apartments are concentrated in cupboards (technical ducts), located at the level of the various landings. Annotations then make it possible to identify the valves associated with each apartment, knowing that these are generally located next to the individual water meters.
Be careful, therefore, not to turn off the neighbours' water supply!
Finally, in many cases, the water inlet tap can also take place inside the housing. It is thus found in the toilet, in the kitchen, or, to a lesser extent, in the bathroom. As this is installed on pipes, it is most often located near the ground.
I have no water in my apartment
• If you suddenly don't have access to water anymore in the apartment, the cause can be one of the two reasons below:
- The apartment's water valve is shut-off
- Check near the water meter that the water supply has not been cut off by accident. For example, this could have happened when a neighbor was completing maintenance work in their apartment.
- To do so, you will need to check whether the valve is in an open or closed position, as demonstrated on the picture below. If the valve is in a upright or vertical position, then the water supply is cut off. However, if the valve is in a horizontal position placed, it is open.
- External issue
- If the valve is in the open position but there is sill no water in the apartment, the reason is probably because of external maintenance work in the street or in the building that requires for the water to have been cut off. You should have seen a notice informing you of this in the communal areas of the building that says what time the water will be cut out from and until.
- If the problem persists, please contact our support team.
I have no hot water
In order to resolve the issue with your hot water, you will first need to check as to how the water is heated in your apartment . You will be able to find this piece of information in the article concerning your apartment. There was a link to this in the email you received with the details to pick up your keys at the beginning of your stay.
There are 3 possibilities :
- Communal Hot water
If your hot water is common to the whole building (central boiler or heating system: radiator leading to the floor or walls), you cannot do anything. You can check if there is a specific display in the common areas (informing of works or cuts). If it lasts more than a day, you can contact us so that we see with the building manager, the only decision-maker.
- Hot water tank
- It is is possible that an electrical cut-off has stopped your hot water tank from heating. You can check if this is the case or not by heading to your electrical switchboard and checking that none of the switches have been flicked down.
- You might also have no hot water due to the volume of the tank. If you have used lots of hot water, it is possible that the tank contains no more hot water. So, you will have to wait for it to fill back up. (It will normally take about 6 hours for the tank to fill back up completely).
- Boiler
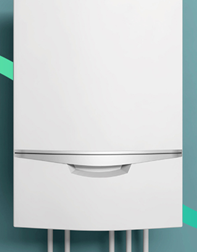
Check if there is an issue (light off) on the boiler.
If you cannot find the cause of the problem and it is becoming a frequent issue, please contact us.
If a maintenance number is displayed on the boiler, you can contact to check if a technician can come by as part of the maintenance.
There is mould in my apartment
We remind you that it is important to ventilate the housing and especially the water features (after use).
Damp on the walls can have multiple origins and consequences on your health. It is therefore necessary to have the right diagnosis to get rid of the problem on a long-term basis.
Have mould patches come about on your walls or ceiling?
First of all, you will need to work out where the mould is coming from. In certain cases, the stains or patches will be due to a specific incident when the surface was exposed to water. For example, a window could have been left open while it was raining and the wall could have become wet as a result.
If the patches are very small and you do not see any traces of a leak or a damp patch, you can clean these off using a sponge.
The cleaning process
To get rid of mould on the walls, the it is advisable to use a product containing bleach:
- Use some rubber gloves and a mask to prevent you from coming touching the bleach or inhaling the fumes
- Dilute some bleach or white vinegar in some water
- Pour the mixture into a spray bottle
- Spray it on the patches of mould
- Rub the surface with a sponge
- Keep doing this until the surface is clean
Mould patches have appeared on your wall or ceiling and the surface seems to be damp
If the walls or ceiling of your property that have been affected by mould seem to be damp or you can see small drops of water near to the mould patches, there is potentially a leak. If you notice this, please immediately get in touch with our technical team via intervention@lodgis.com making sure to explain the following :
- Where are the mould patches and how long have they been there for?
- If the mould patches are on the ceiling, does it appear that a leak is coming into the apartment from one of the floors above?
- If the mould patches are on the wall, is this wall adjacent to a water outlet such as a bathroom or the kitchen sink?
- Send pictures
My sink is clogged
A plug quickly arrived in a sink or sink. The causes of your sink clogged can vary:
- Cooking fats have clumped together.
- Hair clogs the sink.
- Food scraps have accumulated.
- Algae began to grow in the pipes.
- Scale or limescale has clumped together in the pipes.
These problems can block the flow of water to the septic tank and create bad odors.
If the water in your sink takes a long time to drain away or doesn't drain at all, it's probably because the drain pipes are blocked. This could be because of hair and soap if it's a bathroom sink, or bits of food if it's a kitchen sink. You must use the protective grill placed over the plughole to stop anything other than water from going down the plughole and blocking the drainpipe. You will always need to make sure to clean this off after each time you have used the sink.
Unclogging your sink
- Clear the space under the U-bend : this is normally used as storage space, so you will need to free-up some room under the sink to reach the pipes.
- Put a bowl under the U-bend to catch the stagnant water from the pipes.
- Unscrew the bottom part of the U-bend : To unscrew the plastic U-bend, you will not need any specific tools, you can just use your hands. Be sure to hold the top part steady so that you don't off-set the rest of the plumbing.
- Check if anything is still stuck : normally, the water and things that were stuck empty out into the basin. Be careful not to lose the washer from the U-bend which you will need to put back before screwing the U-bend. Now, through the plug hole, check if anything remains in the pipe. If so, you can use a small wire hook or an old toothbrush to clear the blockage.
- Screw it back together again : don't forget to put the washer back inside the siphon before screwing everything together again. You will need to make sure to keep hold of this seal and to not lose it. If it is lost or thrown away, the whole U-bend will have to be replaced.
- Check that there's no more leak, tighten if needed : Perform a test by running the water and check that there are no leaks. If so, screw the U-bend and pipes a little tighter.
If you continue to encounter the same problem, please contact our technical team.
My shower is clogged
• Shower U-bends, (the part of the shower where the water drains into the drainpipe), can clog because of hair, minerals in hard water and soap. You must use the protective grill that goes over the plughole and prevents material from getting clogged in the drainpipe. You will ned to clean this after each time you use the shower.
These various methods enable to unclog your drainpipe.
Method 1
Check that nothing is blocking the plughole where the water drains away. Otherwise, remove the metal grill and simply take out whatever is blocking the pipe with your hands or a metal rod if the clog is further deep in the siphon.
Method 2
If Method 1 does not work, you can try pouring boiling water in the plughole. Hot water should help unclog whatever is blocking the pipe.
Method 3
Pour baking soda mixed with white vinegar into the drain. Wait 30 min then pour boiling water down the drain. This should help to get rid of the clog. Be warned that foam might be created due to the chemical reaction.
If the problem continues, please contact our technical team.
My toilets are clogged
Warning: If it is a Sanibroyeur it is extremely sensitive, contact us to involve a professional.
Toilets are usually clogged because of too much toilet paper, sanitary tampons, cotton swabs, baby wipes ... We therefore ask you not to flush anything down the toilet except paper. Due to their use, toilets can be dirty but you can protect yourself with gloves.
White vinegar can be used to unclog toilets. Mix 1/2 liter of white vinegar in a saucepan with 1 liter of water and heat everything. Pour the mixture into the toilet bowl and let stand for 20 minutes. Then flush the toilet.
To unclog your toilets, we recommend the use of protective rubber gloves. Due to their nature, toilets are generally dirty, but the gloves and the use of a face mask should protect you from germs.
You can use several methods to unclog the toilet :
Method 1 : Baking soda and vinegar
- Pour baking soda in the toilets.
- Then gently pour a medium-sized bottle of vinegar (it doesn't matter what type). A chemical reaction will take place and the mixture will create a foam.
- Let the mixture work for several minutes.
- Add 3 ou 4 litres of hot water in the bowl, which should help the mixture clear the clog.
As this mixture creates a mousse, we strongly recommend that your wear a mask during the process.
Method 2 : Using a hanger
This method usually works better when the clog is a few centimeters away in the drainpipe.
- Undo a metal hanger and unwind each end until they are no longer connected.
- Put it in the pipe. Once the hanger has hit the clog, try pushing it in using circle movements to unclog the pipe.
If the problem continues, please contact the technical team.
The toilet water keeps running
If you notice that water is flowing continuously into the bowl, it is possible to repair this problem without needing to ask for a plumber.
Steps to follow :
- Unscrew the flush cap. It will normally be located on the toilet water tank.
- Remove the tank cover to check the flush mechanism.
- Make sure that the flush mechanism is well screwed in place (it looks like a plastic rod).
- Check that the same mechanism falls completely when you flush (you will need to make sure that the mechanism does not remain suspended, otherwise the water does not stop flowing).
- Replace the tank lid and screw on the cap that allows to flush the toilets.
- Flush the toilet to check that it is working properly.
- Wait until you no longer hear the water flowing in the tank.
If the water no longer flows into the bowl, you have successfully repaired the problem. However, if the water continues to flow, please contact us.
If you are worried about consuming too much water, you can turn off the toilet water inlet, using the valve next to the toilet.
ELECTRICITY AND GAZ
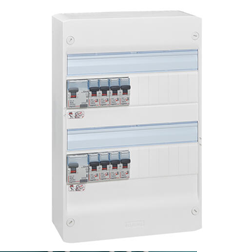
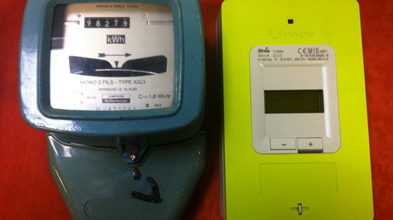
Distinct electric meter and electrical panel
Electrical panel:
Electric meter (2 different types):
I don't have electricity
If you no longer have electricity, you will first need to determine what type of power cut you have had:
- A power-cut in a specific room or area of the apartment
- A power-cut in the entire apartment
- A power cut in the entire building
One you have established this, take a look at the electrical switchboard in your apartment to see all of the electric power sources coming into your apartment.
The electricity has cut out in the building
If there has been a general power-cut in the building, you can get in touch with your neighbours and point the issue out to our technical team.
The power has cut out in one part of the apartment
For example, a light, the boiler or a specific device is no longer functioning.
You will have to test the plugged-in devices located in the room of the apartment where the power has been cut off:
- Turn off or unplug all devices in the room with the power issue.
- Push up (ON) the main circuit breaker switch and leave the the local breaker switch of the room in question in a down position (OFF).
- Plug in and turn on each electrical appliance one by one. Then, push up the localised switch for the room in question to identify which appliance is responsible for the issue. The appliance that cuts the electricity again is the faulty item, get in touch with support if you require for this appliance to be replaced.
Now that you have identified the faulty appliance, you can now contact our technical team at intervention@lodgis.com.
The electricity has gone off in all of the rooms of the apartment
If there has been a power-cut in your apartment or your house, you will need to test the appliances that were plugged in at the moment the power outage.
Knowing where the issue has come from will allow you to see if this has come from a specific piece of equipment in your property, such as a faulty boiler or toaster.
So, you are going to need to test all of the appliances that were plugged in. To do this, please follow these steps:
- Put all of the switches in the down position (OFF), except for the main one which you will need to leave up, (ON).
- Then switch the local switches on one by one until the power cuts out again. You will then know in which room of the apartment the problem is located in, (the little stickers on the fuse box will indicate which room the faulty device is in).
- Shut down all electric devices in the room concerned.
- Push up all of the switches so that they are on again. (This means both the individual "local" switches and the main circuit breaker).
- If the power comes back on, the issue was only due surge in the apartment where too much electrical current was passing through the system and it cut out as a safety precaution. Most of the time, the use of all of the electrical appliances were being used at the same time, this is what will have caused the issue.
- If the power still isn't on due to the electricity cutting out again, you will have to test all the electrical appliances in the room where the issue occurred. To work out which device is the faulty one, you will have to unplug them one by one while reactivating the switches on the main board for each test. You will then be able to know which device is the reason of the shutdown. Once you have identified it, make sure to unplug it and to no longer use it.
Congratulations! Having identified the faulty appliance, you can now contact our technical team at intervention@lodgis.com so we can help you with the next steps.
NB. The issue might have come about as a result of a faulty plug socket. You can also test the device which causes the power cuts in another plug to check whether it is the appliance or the plug which is the issue.
HEATING
I have no heating in the apartment
If there is a problem with the heating in your property, the first thing you will need to do is to check whether it is an issue in all of the rooms, or just in one room.
Heating is common
If your heating is common to the whole building (central boiler or heating system: radiator leading to the floor or walls), you cannot do anything. You can check if there is a specific display in the common areas (informing of works or cuts). If it lasts more than a day, you can contact us so that we see with the building manager, the only decision-maker.
Individual heating
If you have individual heating that can be controlled from inside the apartment :
Electrical heating
Check the dials on your radiators:
- On the heater:
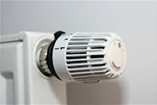
Most of the time you can find dial to adjust the termperature on the side of the radiator. It might be located at the top or bottom of the radiator.
- On the general control panel:
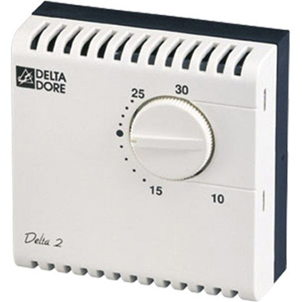
In some apartments the heating is also centralised through a small control panel, often located in the biggest room. In this box, you can modify the temperature of all of the radiators in order to avoid excess consumption by keeping your radiator at maximum heat. This does not prevent you from adjusting the temperature of the heating in your room separately.
If your radiator was switched off or the general thermostat was on the summer setting, you will need to wait for a few minutes before the heating begins. You can also check your electrical board in case there was an electricity cut.
If this is not the case, please contact our technical team telling us which tests you already did (with pictures).
Checking the boiler
You may find that your boiler is on the summer setting, which means that the heaters have not been activated. In order to switch them on, please follow the instructions below:
- Old boiler:
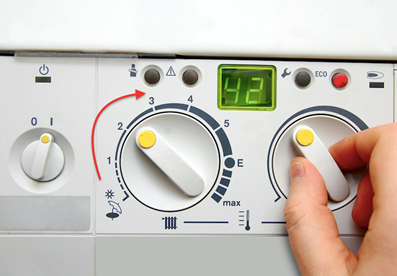
For old types of boilers, you will simply need to check the "chauffage" thermostat and check if it is on the summer setting. If this is the case, you will just need to turn the dial clockwise to increase the heating in your apartment.
- Digital boiler:
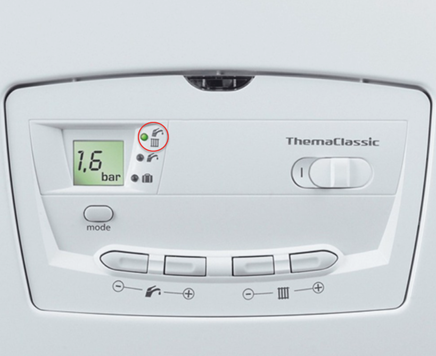
For digital boilers, you may have a non-heating mode. You will simply change the setting by pressing the "mode" button to obtain a small green LED light next to a tap and a heater.
If the problem continues, please contact us directly at intervention@lodgis.com.
My radiator is not working
It is possible that your apartment is being heated, but the radiator in one room is not working. You must first find out as to whether this issue is isolated to one room or several.
Checking an electric heater
- First of all, you can check if the radiator is plugged and turn on by checking on itself directly.
- If the electric heater does not have a digital display, there should be an on/off button on side of a temperature control. If this is the case, make sure that the on/off button is activated and that the heating level is not below 5, as shown in the photo below.
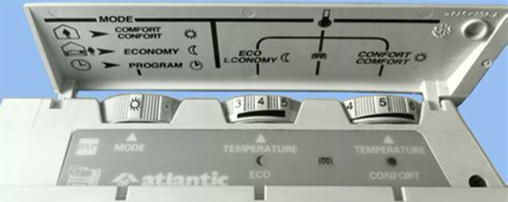
Checking my non-electric heater
You will need to turn the tap on the side of the radiator and wait to see if you hear a small noise of running water on the inside. You can also check to see if all of the radiator is cold, or if it only one part of it that is being heated, for example just the top of the radiator.
If the control panel of your central heating and your radiator are not allowing you to turn your heating on, please get in touch with us.
HOUSEHOLD APPLIANCES
How to maintain the vacuum cleaner
Remember to clean the vacuum cleaner filter, pay attention to the storage of equipment.
I have an issue with my dishwasher
Check on the appliance manual available online on the internet if an error message is displayed (indicating the reference of the appliance you will find the manuals in the desired language).
The dishes are not clean or with white marks
If your plates are not clean after washing and rinsing, it could be due to several factors.
The most common is a problem with the spray and wash arms, the rotating parts of the dishwasher that distribute water through the tub to clean dishes. If they are clogged or clogged, the water will not be distributed evenly. Clean them regularly and at the same time wash the filter, which can quickly become clogged.
White streaks on dishes may indicate hard water or limescale buildup in the dishwasher. Consider using a detergent made specifically for hard water or adding a water softener or rinse aid.
If the problem is not with the points already mentioned, you can also check if you are using the correct amount of detergent and the water temperature settings. Don't overload your appliance with plates and cutlery. Finally, remember to clean the inside of your dishwasher with white vinegar to degrease it.
Water does not fill the dishwasher
If water does not fill your dishwasher during the wash cycle, there are three possible entry points for dishwasher failure:
- The water inlet valve: this is the valve located under the sink that controls the water supply to the dishwasher. If the water inlet tap is closed, the dishwasher will not be able to receive water.
- The water inlet hose: check that it is not clogged or kinked and that the water can flow easily.
- Or the float: it is a part inside the dishwasher that regulates the water level during the cycle. If it is stuck, the dishwasher will not fill. You can solve this problem by removing the float and cleaning it once disassembled.
Dishwasher water not draining
Water not draining properly from dishwasher at end of cycle and risking overflow?
It could be a blockage in the drain hoses, filter or drain pump. The drain hose is the part that carries dirty water out of the dishwasher. If there is a clog or it is overloaded with residue, the water will not be able to be evacuated. You can use a cleaning product (white vinegar). The dishwasher filter may also be clogged. It is important to clean it regularly to avoid blockages.
Either way, avoid filling your household appliances with dishes that have a lot of dirt or food residue.
My dishwasher no longer dissolves tablets
If the dishwasher does not dissolve the detergent tablets, it may be due to:
- a blocked or damaged spray arm propeller,
- an excessive amount of dishes in the dishwasher,
- a washing temperature that is too low to dissolve the tablet,
- insufficient water pressure,
- or a problem with the detergent box located in the door of the dishwasher: does the flap open easily? Its mechanism may be seized up, preventing the washing tablet from dissolving. If you can't find a spare part to replace it, just put the tablet in the cutlery basket.
My dishwasher is no longer drying
If there is water left in the bottom of the tub at the end of a cycle, it may prevent effective drying. Clean the filter and check that the drain hose is not kinked, preventing water and moisture from draining out. Poor drying performance can also be caused by a faulty dryer element, a damaged fan or an excessive amount of humidity in the dishwasher.
Dishwasher water not heating
If the water is not hot enough, make sure your dishwasher is set to an appropriate water temperature. Also check that the salt box is full of water and that the end of the drain hose is properly inserted into the drain outlet.
The lack of heating may be caused by a larger problem such as a faulty heater resistor, a faulty thermostat or an electrical connection issue. Contact us so that we can involve the after-sales service or a professional.
My dishwasher is leaking
Water leaking from your dishwasher? If it is too high, be careful and unplug your appliance. Then look for the source of the problem to limit your water consumption. It could be due to:
- Faulty door seals,
- Your filter being clogged,
- A damaged drain hose,
- A clogged spray arm, or a water hose connection problem.
Contact us so that we can involve the after-sales service or a professional.
I have an issue with my washing machine
You have a problem with your washing machine. First of all, you have to determine what is not working. You can check on the manual of the household appliance available online on the internet if an error message is displayed (by indicating the reference of the appliance you will find the manuals in the desired language).
Advice: to limit complications with the washing machine:
- Use the right products
- Put the appropriate laundry load in the washing machine
- Be careful when choosing a program with a high temperature: your laundry must be "suitable" for this temperature; also pay attention to your laundry combination to avoid pilling and damage
- It is important to clean the washing machine regularly and to empty the laundry of all objects before putting it in the machine.
Strange noises
- The washing machine makes noise during operation
Also check that the laundry does not have any metal parts - such as charms or zippers - which could hit against the walls of the machine's drum. If so, the noise should not worry you.
The laundry must be correctly distributed so as not to cause unbalance. The ideal is to respect the maximum recommended loads.
If the problem persists, please contact our technical department at intervention@lodgis.com, indicating all the information on the problems encountered with the device. Note that we will have to validate with the owner if the device is under warranty or requires a replacement.
Attention: Any problem due to a lack of attention, poor maintenance or abnormal use will be your responsibility.
- The washing machine makes noise when spinning
The laundry must be correctly distributed so as not to cause unbalance. The ideal is to respect the maximum recommended loads. Be careful, dry laundry weighs less than wet. The weight to be taken into account is the wet one.
If the problem persists, please contact our technical department at intervention@lodgis.com, indicating all the information on the problems encountered with the device. Note that we will have to validate with the owner if the device is under warranty or requires a replacement.
Attention: Any problem due to a lack of attention, poor maintenance or abnormal use will be your responsibility.
- The washing machine makes noise during draining
If the washing machine makes noise while draining, check that nothing got stuck in the pump. Also clean the drain pump filter (or object trap, if applicable).
The laundry must be correctly distributed so as not to cause unbalance. The ideal is to respect the maximum recommended loads.
If the problem persists, please contact our technical department at intervention@lodgis.com, indicating all the information on the problems encountered with the device. Note that we will have to validate with the owner if the device is under warranty or requires a replacement.
Attention: Any problem due to a lack of attention, poor maintenance or abnormal use will be your responsibility.
Leak problem
Has the porthole (if there is one) been securely closed?
Did you notice a problem with the seal?
Did you clean the detergent drawer well? This causes deposits that can damage the proper functioning of the washing machine.
If this continues:
- Stop using the washing machine to avoid aggravating the situation.
- Clean the affected area immediately to avoid collateral damage.
- Contact us.
Wringing problem
The washing machine no longer spins:
- Check that the washing machine has drained properly.
- Check that the laundry is not balled up in the drum. Some washing machines can detect this phenomenon and inhibit the spin cycle to avoid vibrations or excessive noise.
- Check that the drum rotates correctly when idle.
Drain problem
The water does not drain. Check that no object has become stuck in the drain filter or in its housing.
Problem with washing clothes
- The laundry is not washed
The laundry is wet but not washed. If the drum of the machine no longer rotates, the problem may be with the belt, the motor, the motor pulley or the drum pulley. Contact us to get a professional involved
- The laundry is poorly washed
Check that you haven't overloaded the machine: if the drum is too full, the laundry will not stir properly. Respect the maximum capacity of the drum.
If white marks appear on your clothes, pay attention to the detergent dosage. The white streaks could be undissolved powder detergent residue. Note that liquid detergents are also likely to leave residue, but they can more easily go unnoticed! Hence the importance of properly measuring out your detergent, in powder or liquid form.
There may also be a drainage problem. The drain filter should be kept relatively clean. Do not hesitate to clean it. Also check that the drained water is not backed up by the drain of your home.
Finally, a problem with poorly washed laundry may be due to water that does not heat up. Descale and clean your washing machine: pour a liter of white vinegar into the tub and run the machine empty at high temperature (60°C or 90°C). Also clean the detergent drawer, it could be clogged with residue.
Starting problem
- The washing machine does not start anymore
Start by checking the door: it may not be properly closed. In this case, the safety prevents the washing machine from starting.
Also check the power outlet your machine is plugged into. Try the socket with another object such as a lamp, tested beforehand on another socket. If the chosen object works, the problem does not come from your electrical installation but from your washing machine. Otherwise, after checking the condition of the fuse and the circuit breaker, it is necessary to have your socket and your electrical installation checked by a professional.
If you hear a slight hum - due to power to the solenoid valve - take a look at the water inlet valve. Check that it is fully open and that the water inlet hose is neither bent nor jammed.
- The washing machine no longer works
It makes no noise, no lights are on...
First, check that the washing machine is properly closed. Open it and close it again. Also check the "on/off" switch. The button may be stuck or broken. Finally check the selected program and press the start button again. Before concluding that there is a fault, wait a few minutes for the door safety device to activate, which is essential for the washing machine to be able to start.
If the problem is not solved, check the electrical installation. To do this, unplug the washing machine and plug in a lamp instead (tested beforehand): if it does not light up, the problem is not with your machine but with the socket. Also check the fuses and circuit breaker. If the problem comes from there, we will call a professional.
- The washing machine motor spins but the drum does not
The washing machine motor is running. However, the drum does not move. The problem may come from the belt contact us so that we can have a professional intervene.
I have an issue with my fridge
- Check on the manual of the household appliance available online on the internet if an error message is displayed (by indicating the reference of the appliance you will find the manuals in the desired language).
- Remember to close the refrigerator properly, Pay attention to the condition of the door seal.
- Do not set the thermostat too high, especially if the refrigerator is not full, store food properly (do not stick to the walls). Clean it regularly and remove the frost if there is any.
- To check the internal temperature of your fridge, you can place a thermometer inside, and, several hours later, raise the number indicated.
- Also be careful that no food hinders the proper closing of the door!
- Unclog the small hole visible in some appliances just above the crisper drawer on the rear wall.
The power supply is faulty
It is possible that the electrical outlet that your refrigerator is plugged into is disconnected or that the current is no longer flowing through it. Plug another device into the power outlet to verify that it is working normally. You can also check the condition of the electrical cord. If it is damaged, you will need to replace it.
I have a problem with my cooker or my stove
Check on the appliance manual available online on the internet if an error message is displayed (indicating the reference of the appliance you will find the manuals in the desired language)
- Distinguish between induction hob and ceramic hob: to distinguish an induction hob from a ceramic hob. Just activate the plate with nothing on it, and if the hotplate turns red and heats up, then it's a ceramic hob, otherwise it's an induction hob.
- There may be an indicator light with a letter indicating whether, for example, the plate is safe, or whether there is a fault. Water or food residue can also trigger a plate trip.
- Be careful to clean your hob thoroughly without rubbing too hard and using suitable household products (no abrasive products). A simple sponge and a little baking soda combined with white vinegar.
- Appropriate kitchen equipment must be used.
- Is the plate no longer illuminating and the fuse no longer active on the electrical panel? there may be a short circuit problem. In this case, contact us. A specialist must be involved.
Problem with the oven
- Check on the manual of the household appliance available online on the internet if an error message is displayed (by indicating the reference of the appliance you will find the manuals in the desired language).
- First of all, first reflex to have, check that it is well connected, that the socket is not disconnected and that it works. If needed, use another electrical device such as a phone charger or hair dryer.
- Alternatively, your device's clock is set incorrectly. Far from being used only as a watch, it also allows you to adjust your oven. If it's on but not on time, check your device's manual for how to adjust it.
- Check that your built-in oven is clean, if not, carry out a catalysis or a pyrolysis if you have these programs. If you have a traditional oven, you can clean it yourself, either with the products intended for this, or for a more natural cleaning with white vinegar, baking soda or even the two combined (be careful, this can foam a lot).
Why does my oven turn off by itself?
If your oven is gas, check that you have gas left. If so, then the problem may be with the injectors. For gas-related problems, we advise you not to try to repair them yourself, as a mistake could prove dangerous.
If your oven has a timer, check that it is set correctly, if necessary check this with your manual.
PESTS
I have cockroaches in my apartment
In general, cockroaches appear as a result of sanitary problems in the flat and/or building and are attracted by humidity. If you see cockroaches in your flat, you should provide us with the following information in order to determine the best solution:
- In which room have you seen the cockroaches and for how long?
- Are the cockroaches also present in the common areas of the building (staircases, inner courtyard, garbage room, at your neighbours') ? This is essential as it will help us to determine the type of intervention required.
- Are there any holes in the floor, skirting boards, walls, bathtub ? Have you tried to plug them?
As these pests are mainly attracted by food, we suggest that you store it in airtight containers. The rest of the flat should be clean (no crumbs on the floor, no food out of the fridge, and so on) and your bins should be taken out regularly (at least every 48 hours). Once the flat has been thoroughly cleaned, this should prevent new pests from entering the flat.
We suggest that you install poison to eradicate them (which you can buy in supermarkets). As cockroaches are also attracted to dampness, it is advisable to air and clean rooms where dampness is present (bathroom, kitchen toilet, with the dishwasher, etc.).
If the problem persists, please contact our technical team immediately with all the steps taken and the points of entry of the cockroaches into your flat.
I have bedbugs
Bed bugs spread very quickly, so it is important to take the matter seriously and treat it quickly.
Identifying bed bugs
If you think you have bed bugs, you should first consult a doctor or pharmacist to confirm that it is bed bugs and send us the confirmation.
Informing our teams
Following confirmation from your doctor/pharmacist, you should inform our team as soon as possible, providing the following information:
- Do you have any red blotches / bites? If so, could you please send us a picture of them?
- How long have you had these blotches / bites?
- Do your roommates have them too?
- If you see them, send us a photo of the pests.
- Check if there is a notice in the common areas of the building about this.
- Check with your neighbours if they have the same problem.
Bed bugs spread quickly between different rooms and flats. In order to plan the most effective treatment, it is necessary to know which rooms/apartments are infested.
Upon receipt of this information, our technical team can programme an intervention with a specialised company.
Procedure for the intervention
It is necessary to prepare the areas concerned in order for the intervention to be effective. Below is the protocol before the procedure:
- Wash the bedding (fitted sheet, duvet, pillowcases, etc.) at 60C minimum. To avoid the return of bedbugs after the treatment, also wash the linen present and the clothes stored in the infested room.
- Store cleaned bedding, linen and clothing in a non-infested area (if possible) and in closed plastic bags.
- Take down curtains and drapes, wash them, and put them in closed plastic bags as well.
- Empty chests of drawers, wardrobes, bedside tables near beds and infested areas.
Thoroughly vacuum all crevices, skirting boards, peg holes, hinges and seams. Dispose of the vacuum bag in a waste bin outside the house.
ATTENTION, AFTER THE INTERVENTION, it will be necessary to :
- Close and leave the flat for at least 4 hours after the treatment.
- When you return, you must ventilate for at least 2 hours.
- Do not wash the floors for 2 weeks after the treatment.
As pests spread rapidly and in order to be effective, it is necessary to treat the whole flat, even if only one room seems contaminated.
If you have any difficulties or questions, please contact our team.
I have mice in my apartment
In some cities/neighbourhoods, the problem of mice is very recurrent. Some property managers have therefore introduced quarterly or half-yearly treatments in their buildings. Finding a mouse in your house or flat is not uncommon and there are several solutions to this problem.
If you see a mouse or mice in your flat, you should check and send us all the following information in order to consider the best solution :
- In which room did you see the mice? Have you seen one or more mice and for how long ?
- Are the mice also present in the common areas of the building (staircases, inner courtyard, garbage room, at your neighbors') ? This is essential because it will help us determine the type of intervention required.
- Do you see any holes in the floor, skirting boards or walls that could be an entry point for mice? You should try to fill them in (with tape, a cloth, etc.) and then send us a photo.
- If you have seen a notice in the building for a pest control campaign, please send us the information to support@chez-nestor.com
As these pests are mainly attracted by food, please store it all in airtight containers. The rest of the flat must be clean (no crumbs on the floor, no food out of the fridge, and so on) and your bins must be taken out regularly (at least every 48 hours). This should prevent new pests from entering the flat once the apartment has been thoroughly cleaned.
We also suggest that you set traps to catch them (mouse traps, boxes, etc.). You can also put a product that repels mice in the corners of your home and all around doors, cracks and other openings. For example, mice do not like mint and peppermint. You can put peppermint oil all around your home or plant a few mint plants near your windows and doors.
If the problem persists, please contact our technical team immediately via support@chez-nestor.com with all the steps you have taken and the points of entry of the mice into your flat.
INTERNET
Go to the website of the access provider (indicated on the BOX).
Or Call the provider's service, for example: https://assistance.free.fr/
Detect if it's a network problem: https://www.zoneadsl.com/reseau/pannes
The connection may sometimes malfunction due to a problem with the access provider.
The problem with the internet is that it is beyond our control. The connection speed and quality are not always easy depending on the location.
- Is it intermittent or constant? It may take a while to recover. Switch off and on again to restart the box.
- Have you checked the connection of the box?
- How are the lights on the box? If the lights on your box are red, you should first unplug (wait a few seconds) then reconnect your box.
- Does the malfunction concern only part of the services or all of them? Problem with Wifi, TV... -> a message on the box? check on the provider's website.
- What are the identifiers and password used? Is this your main connection or a wifi booster? Is the network present on the list of available and accessible networks?
- The frequency of the problem (all the time, at times, when several people are connected)?
- When you still cannot restore your internet connection, you can now try to restore your Box to factory settings. To do this, simply press the " Reset " button with a paper clip, which is usually located on the back of the case. By pressing this button, you must hold it for a few seconds to restore the default settings. You will then notice that the lights on your Box will light up.
- Hot box -> ventilation problem: turn off and place in a more ventilated place, wait then turn on again.
- If you can access the network, but the connection is slow or non-existent, you can do a speed test (follow this link https://www.speedtest.net/fr) and send us a screenshot.
If the problem persists after these steps, you can contact our technical team so that we can communicate the next procedure to you. Please send us a picture of your router so we can check the lights and a screenshot of the available networks.


